Have you ever encountered a brain-teaser that appeared straightforward but turned out to be surprisingly challenging? This engaging puzzle, titled “Who Is the Thief?”, invites you to put your logical reasoning and observational skills to the test. Among the four women in the image, one is the thief. Can you figure out who it is? Let’s delve into the details and uncover the answer.

Look Beyond Appearances
When tackling the “Who Is the Thief?” puzzle, many people are misled by superficial clues. Facial expressions, posture, or gestures might seem significant but often lead to incorrect assumptions. The secret to solving this lies in a practical detail: their footwear. Yes, the type of shoes they are wearing holds the key to identifying the thief.
Decoding the Clues: Analyzing Their Shoes
The Woman on the Far Left
- Footwear: Heeled boots
- Analysis: While these boots are fashionable, they’re impractical for a quick getaway. The distinct clicking sound they make would easily attract attention, making her an unlikely suspect.
The Second Woman
- Footwear: High heels paired with a casual outfit
- Analysis: Although stylish, high heels are not suitable for running or making a fast escape. They would significantly slow her down in any attempt to flee the scene.
The Third Woman
- Footwear: Knee-high boots
- Analysis: These boots exude sophistication but lack the functionality needed for speed. Similar to high heels, they’re not designed for quick movements or agility.
The Woman on the Far Right
- Footwear: Sneakers
- Analysis: Unlike the others, sneakers are lightweight and designed for quick movements. They provide comfort and speed, making them the ideal choice for someone planning a hasty escape. This practical advantage points to her as the most likely thief.

The Verdict
After carefully evaluating the clues, the answer to the puzzle is clear: the woman on the far right, wearing sneakers, is the thief. Her choice of footwear indicates she is prepared for a swift getaway, which aligns perfectly with the behavior of someone attempting to evade capture.
This puzzle is a great reminder to focus on practical details and think critically when solving challenges. Did you manage to identify the thief? Share this puzzle with your friends and see if they can unravel the mystery too!
Giving a 1942 Vanity Table a New Life
Are you the proud owner of a vintage vanity table that has seen better days? Are you looking to breathe new life into this timeless piece of furniture? Whether you inherited it from your grandmother or stumbled upon it at an antique store, transforming a 1942 vanity table can be a rewarding and creative project. In this article, we will guide you through the process of rejuvenating your cherished vanity table and turning it into a stunning focal point for your space.
Vintage furniture holds a special charm and history, and a 1942 vanity table is no exception. This article will provide you with step-by-step guidance on how to revive and revitalize your vanity table, allowing you to enjoy its beauty and functionality for years to come.
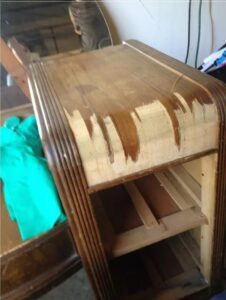
Assessing the Condition of Your Vanity TableBefore you embark on the restoration journey, carefully examine your vanity table’s condition. Take note of any scratches, dents, or missing components that require attention. This assessment will help you determine the extent of the restoration needed.
Choosing the Right Restoration ApproachDepending on your vanity table’s condition, you can opt for a full restoration or a more minimalist approach that preserves its vintage charm. Your choice will influence the techniques and materials you use throughout the process.
Preparing the Work AreaCreating a suitable workspace is essential for a successful restoration project. Clear a well-ventilated area and gather the necessary tools, including safety equipment, sandpaper, paintbrushes, and cleaning supplies.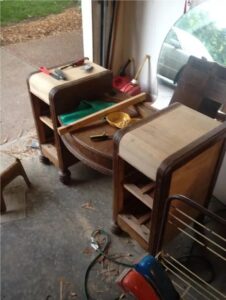
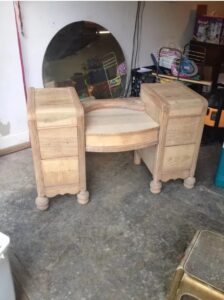
Stripping and Sanding the Vanity Table
To reveal the beauty hidden beneath layers of paint and varnish, start by carefully stripping the old finish. Sand the surfaces to achieve a smooth and even texture, preparing the vanity table for the upcoming restoration steps.
Repairing and Replacing Hardware
Inspect and repair or replace any damaged or missing hardware, such as drawer pulls, knobs, and hinges. Choosing hardware that complements the table’s era can enhance its authentic appearance.
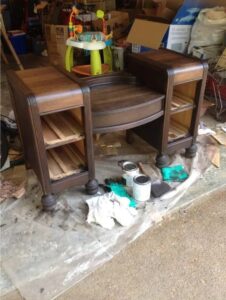
Selecting the Perfect Finish
Choosing the right finish is crucial for achieving the desired aesthetic. Whether you prefer a natural wood look, a distressed finish, or a vibrant color, selecting the appropriate paint or stain will play a significant role in the final outcome.


Leave a Reply